Code+=AI Documentation
Table of Contents
Getting Started
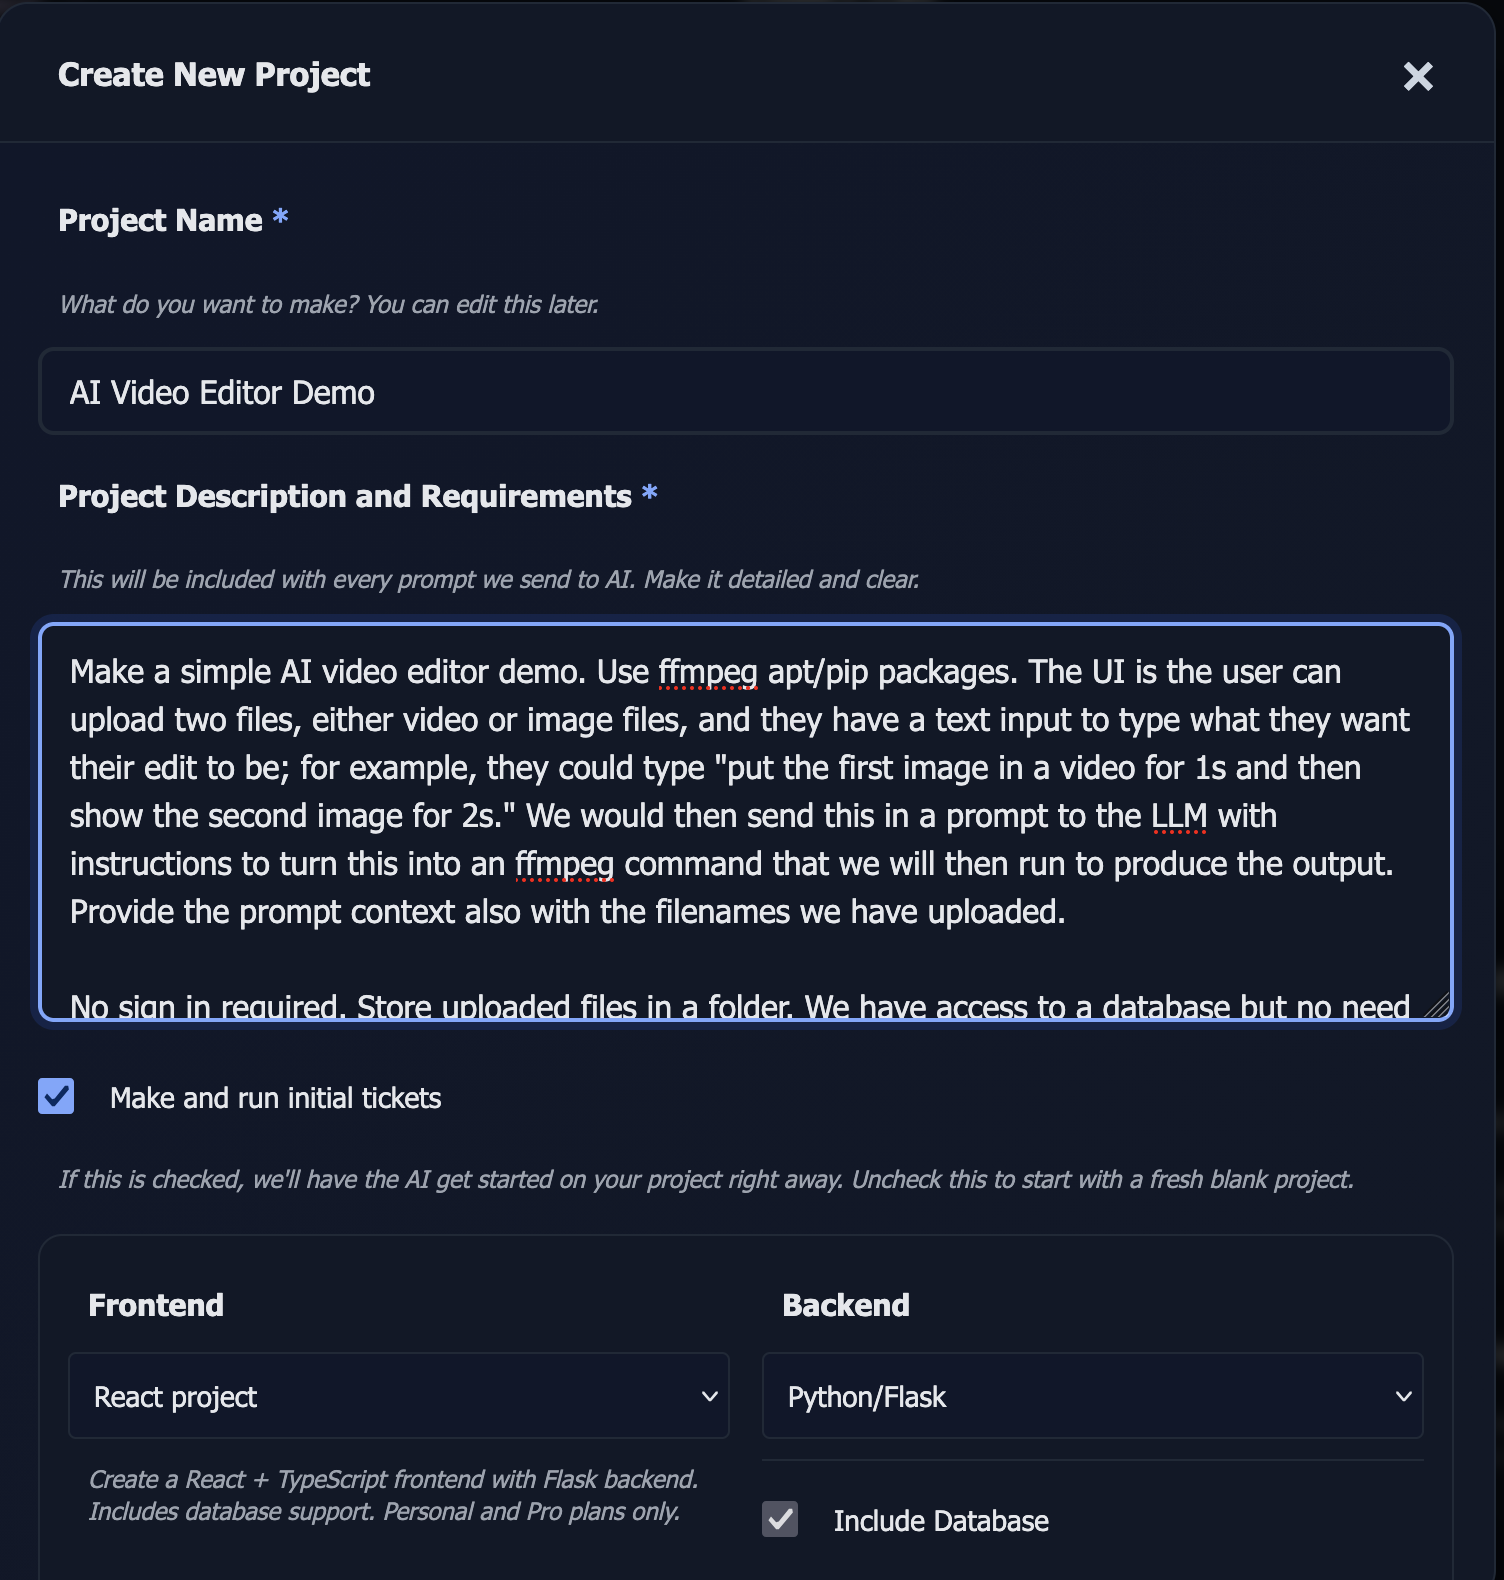
The fastest way to create a webapp on Code+=AI is to provide a Project Title and Description, then let the AI build your initial webapp for you. The AI will analyze your requirements and generate the necessary code files to get you started.
Requirements Gathering (Optional but Recommended)
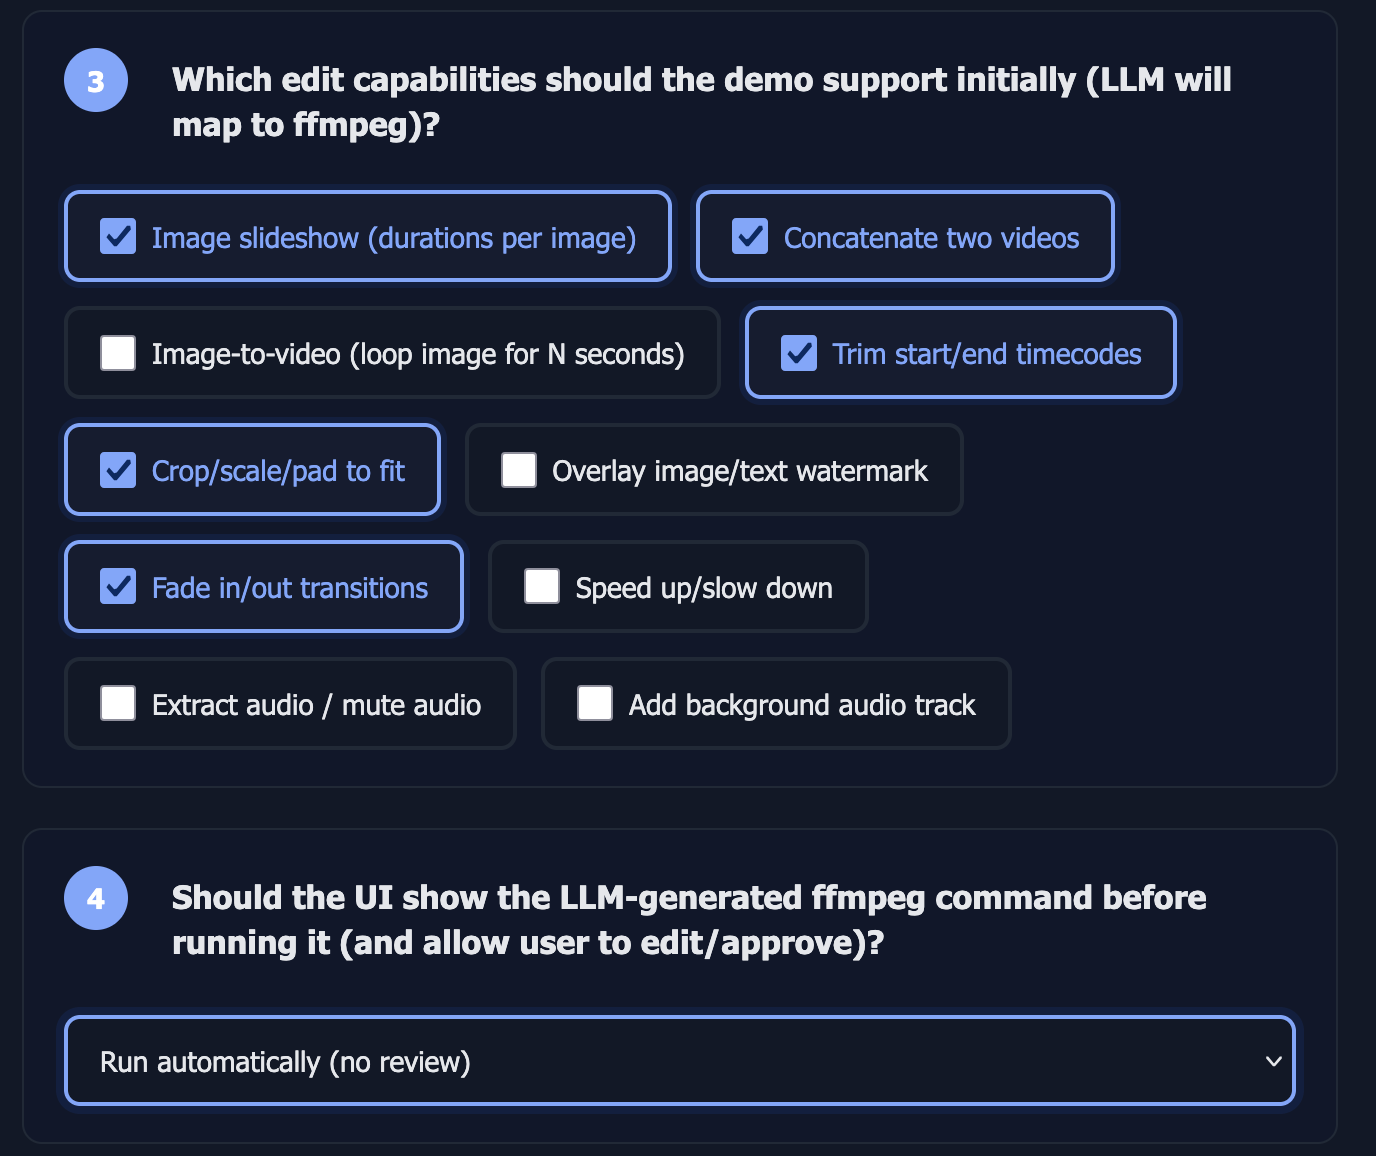
Before the AI starts building, you can use the Requirements Gathering feature to help clarify your project needs. This optional step uses AI to ask you targeted questions about your project, such as user types, desired features, and functionality requirements. Answering these questions helps the AI generate better initial tickets and code that more closely matches your vision. We recommend using this feature for best results, especially for more complex projects.
Requirements Gathering is available when creating a new project. You can choose to skip it and go straight to building, or use it to refine your project concept first.
Basic Workflow
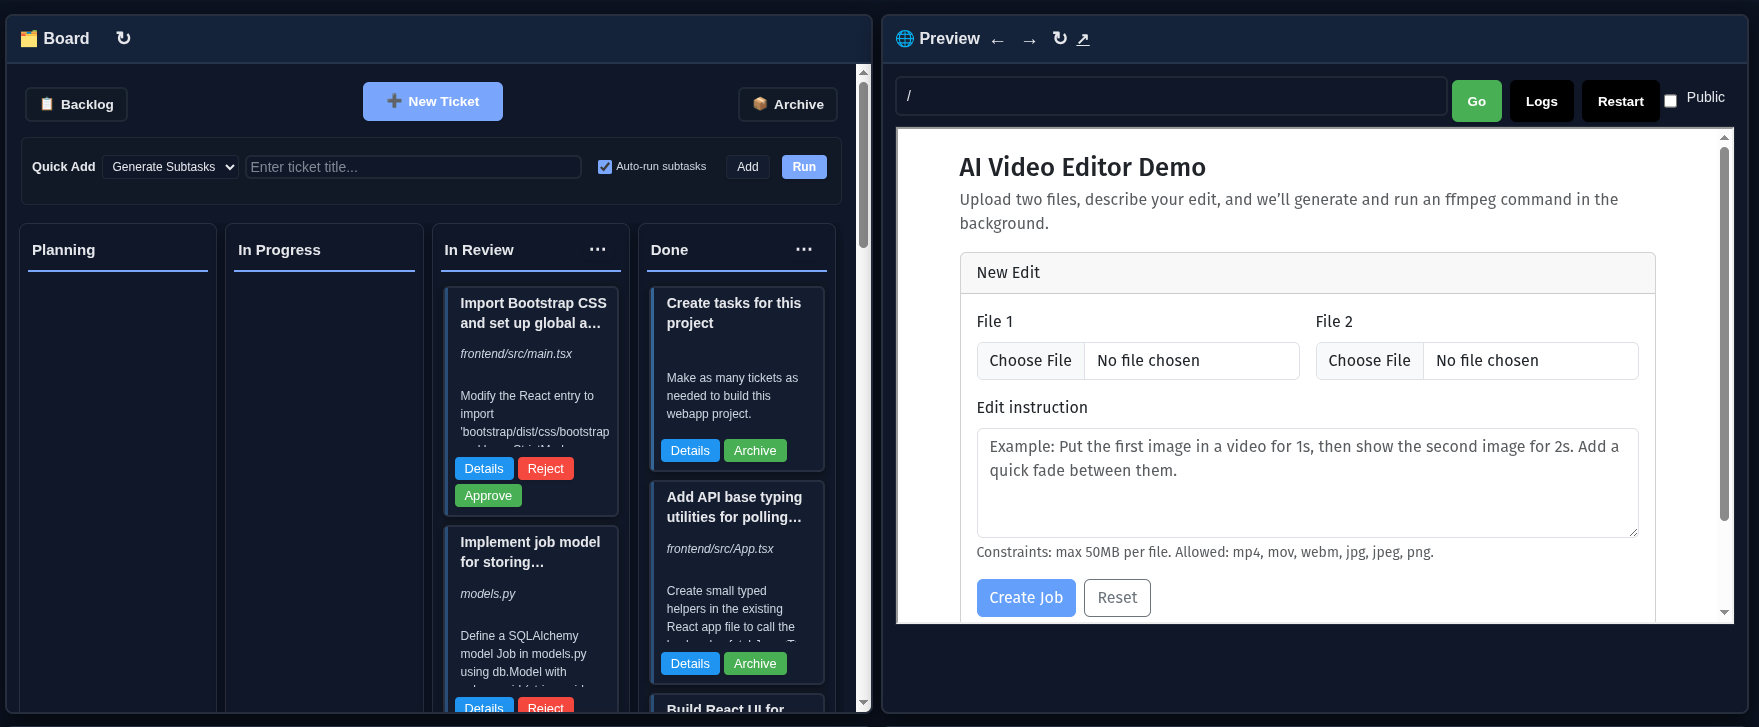
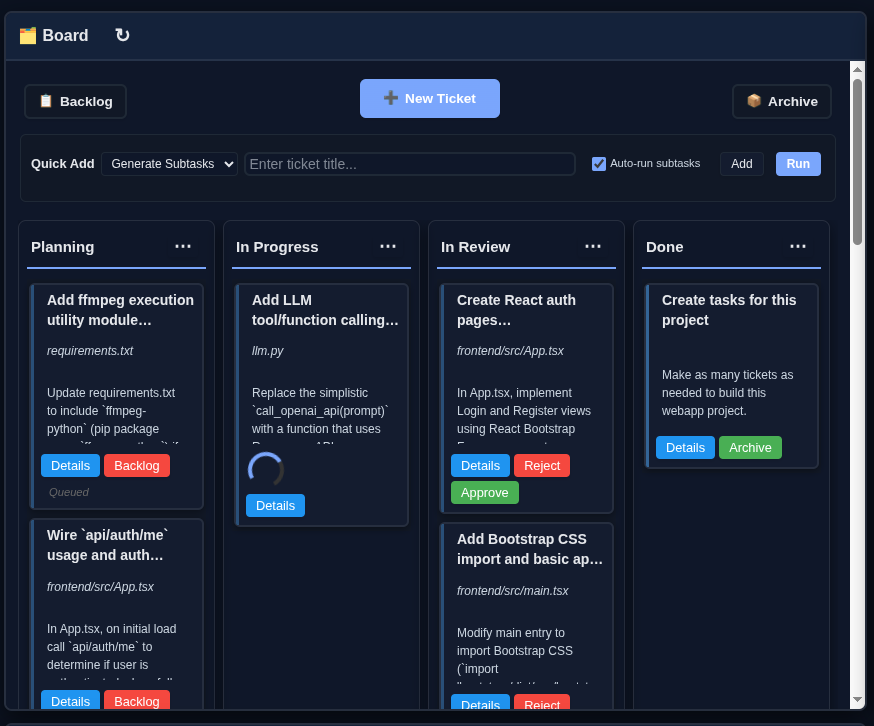
Once your project is created, you work with it through tickets. Each ticket represents a task you want the AI to complete. You write a ticket with a title and description, assign it to a file, and the AI processes it. When the AI finishes, you can review the changes in the preview iframe, approve the ticket to move it to Done, or reject it to discard the changes.
Your project runs in a Docker container that serves your webapp. You can preview it in real-time, edit code manually, manage your database, install Python packages, and more.
Core Features
Projects
Projects organize your work. Each project is a Docker container that serves your webapp. Your project's context, including files, tickets, and conversation history, is included in prompts to the LLM to maintain consistency and understanding of your codebase.
Requirements Gathering
Before starting your project, you can use the Requirements Gathering feature to help clarify your project needs. This optional step uses AI to ask you targeted questions about your project, helping generate better initial tickets and code.
Tickets
Write tickets to tell the AI what work you want done. Be clear and precise in your ticket descriptions. The LLM will attempt to accomplish the task in a single execution. Each ticket is assigned to a specific file, and the AI will create new files or modify existing ones based on your instructions.
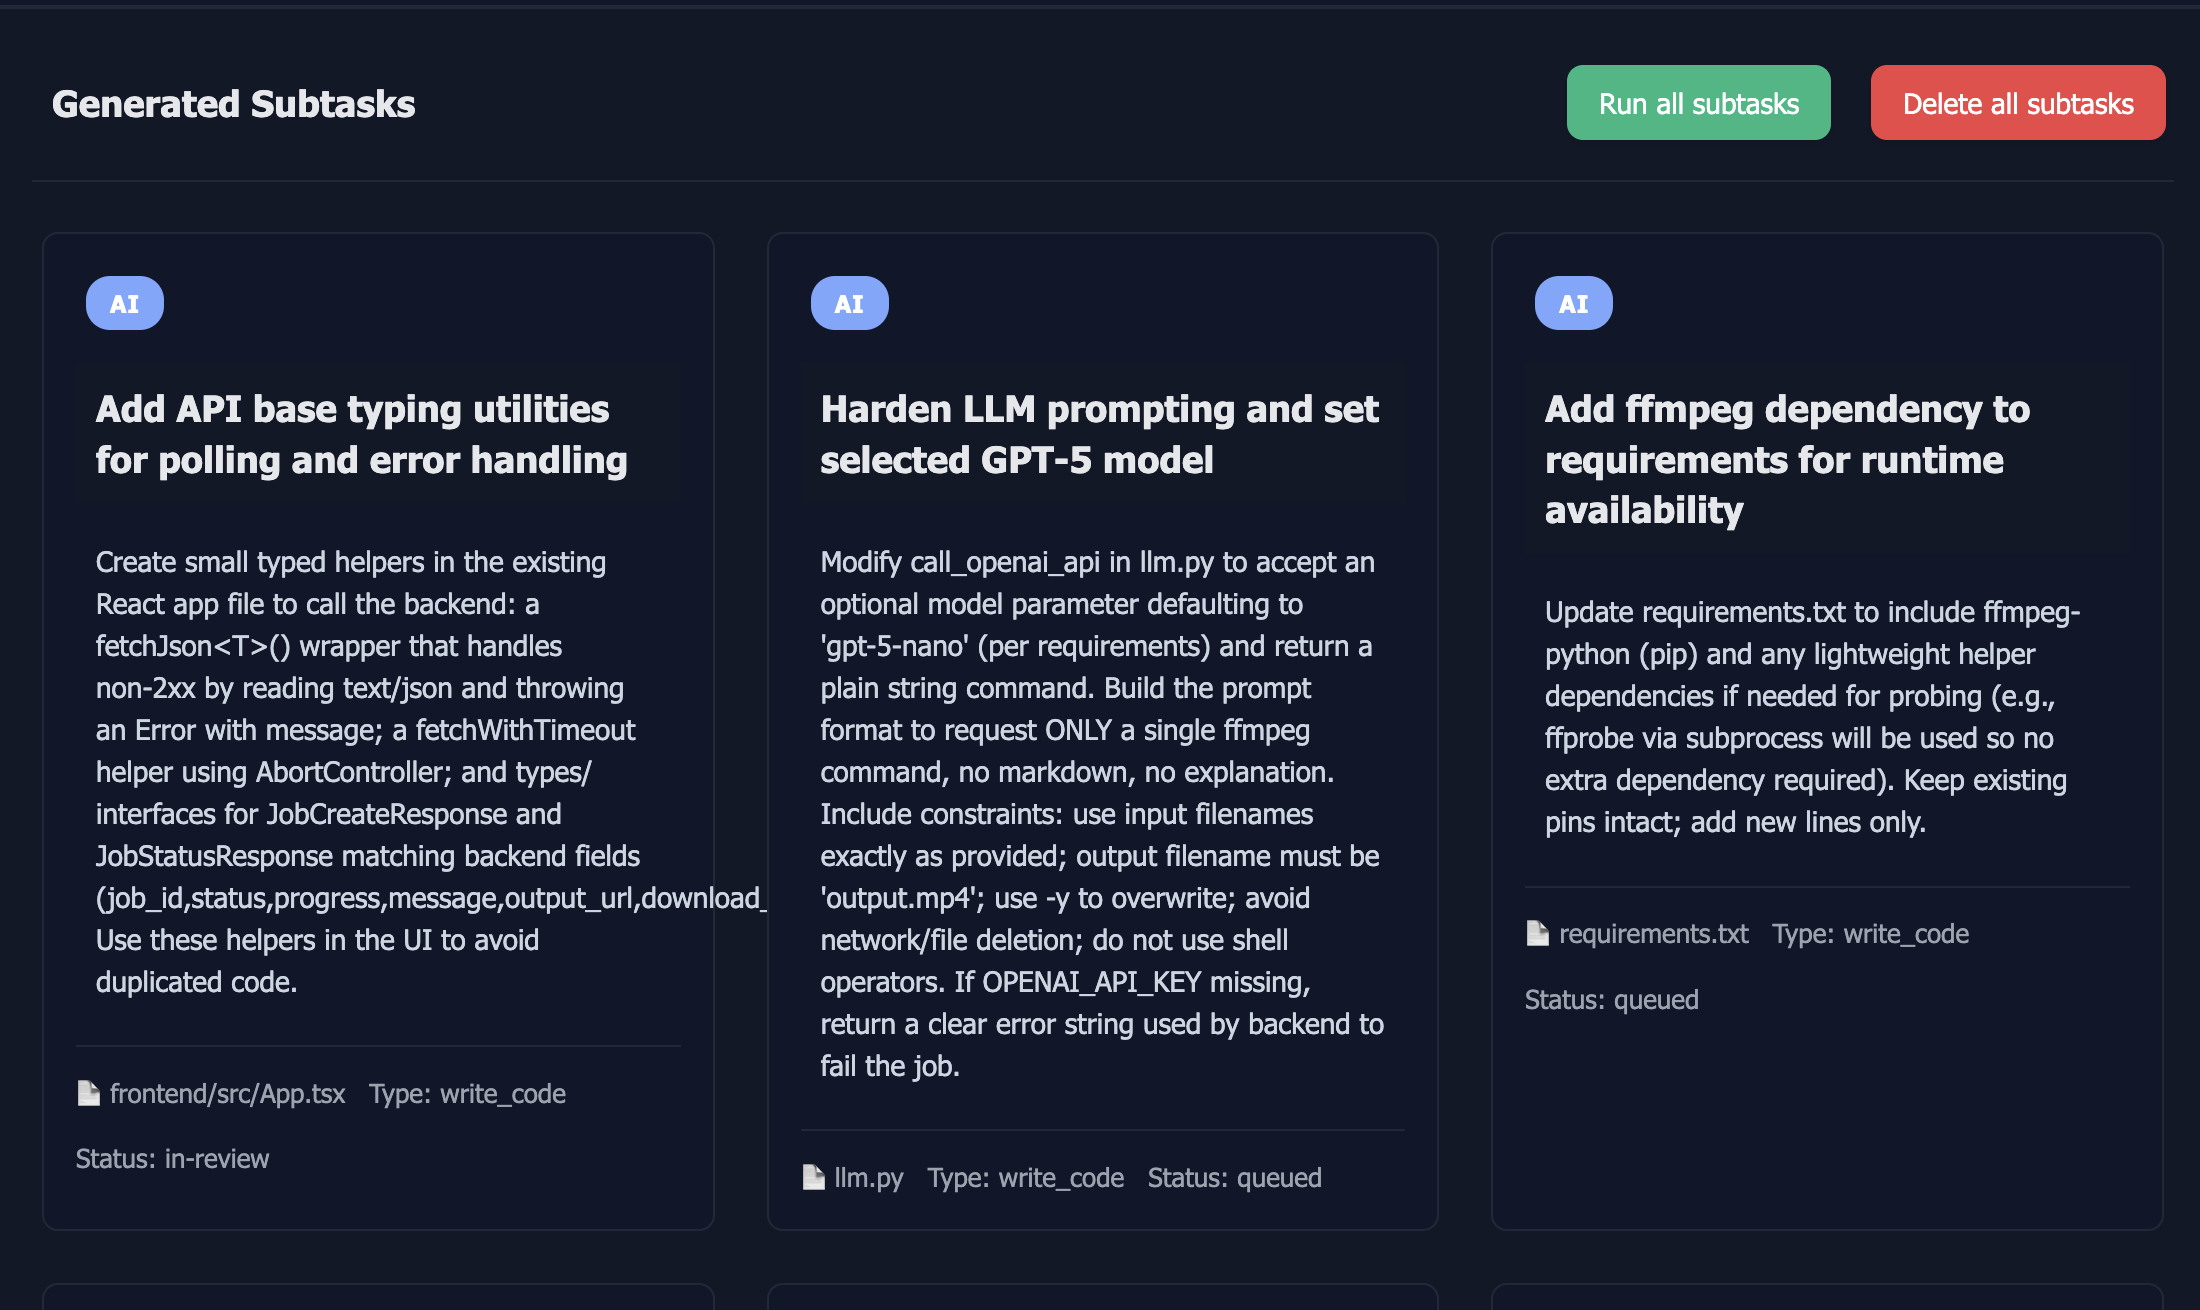
Generate Subtasks
For tickets that are too large or complex to complete in one go, use the Generate Subtasks feature. This uses function calling capabilities of LLMs to break down your high-level description into detailed, actionable subtasks. Each subtask becomes its own ticket that can be processed individually.
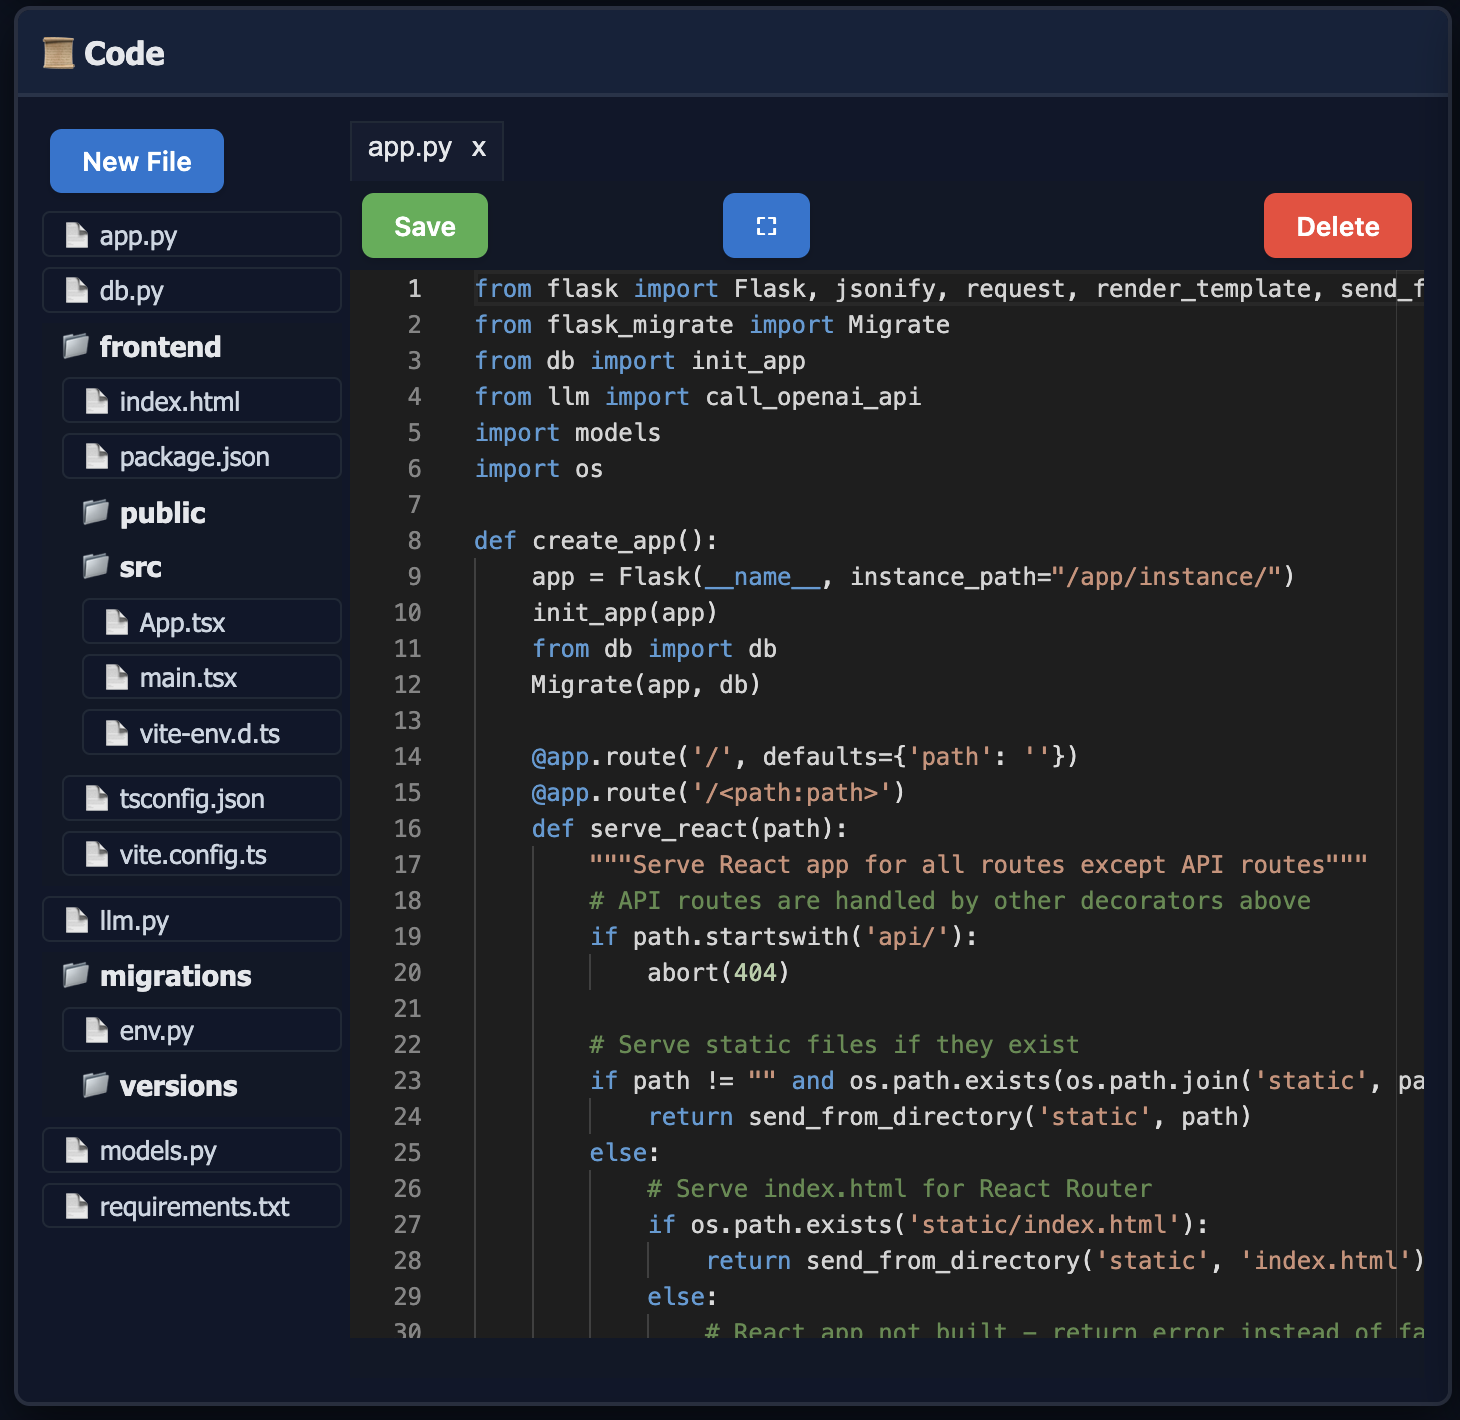
Code Editor
View and edit your project's code files directly in the browser. The code editor supports syntax highlighting and allows you to make manual changes when needed. Changes you make manually can be committed to git separately from AI-generated changes.
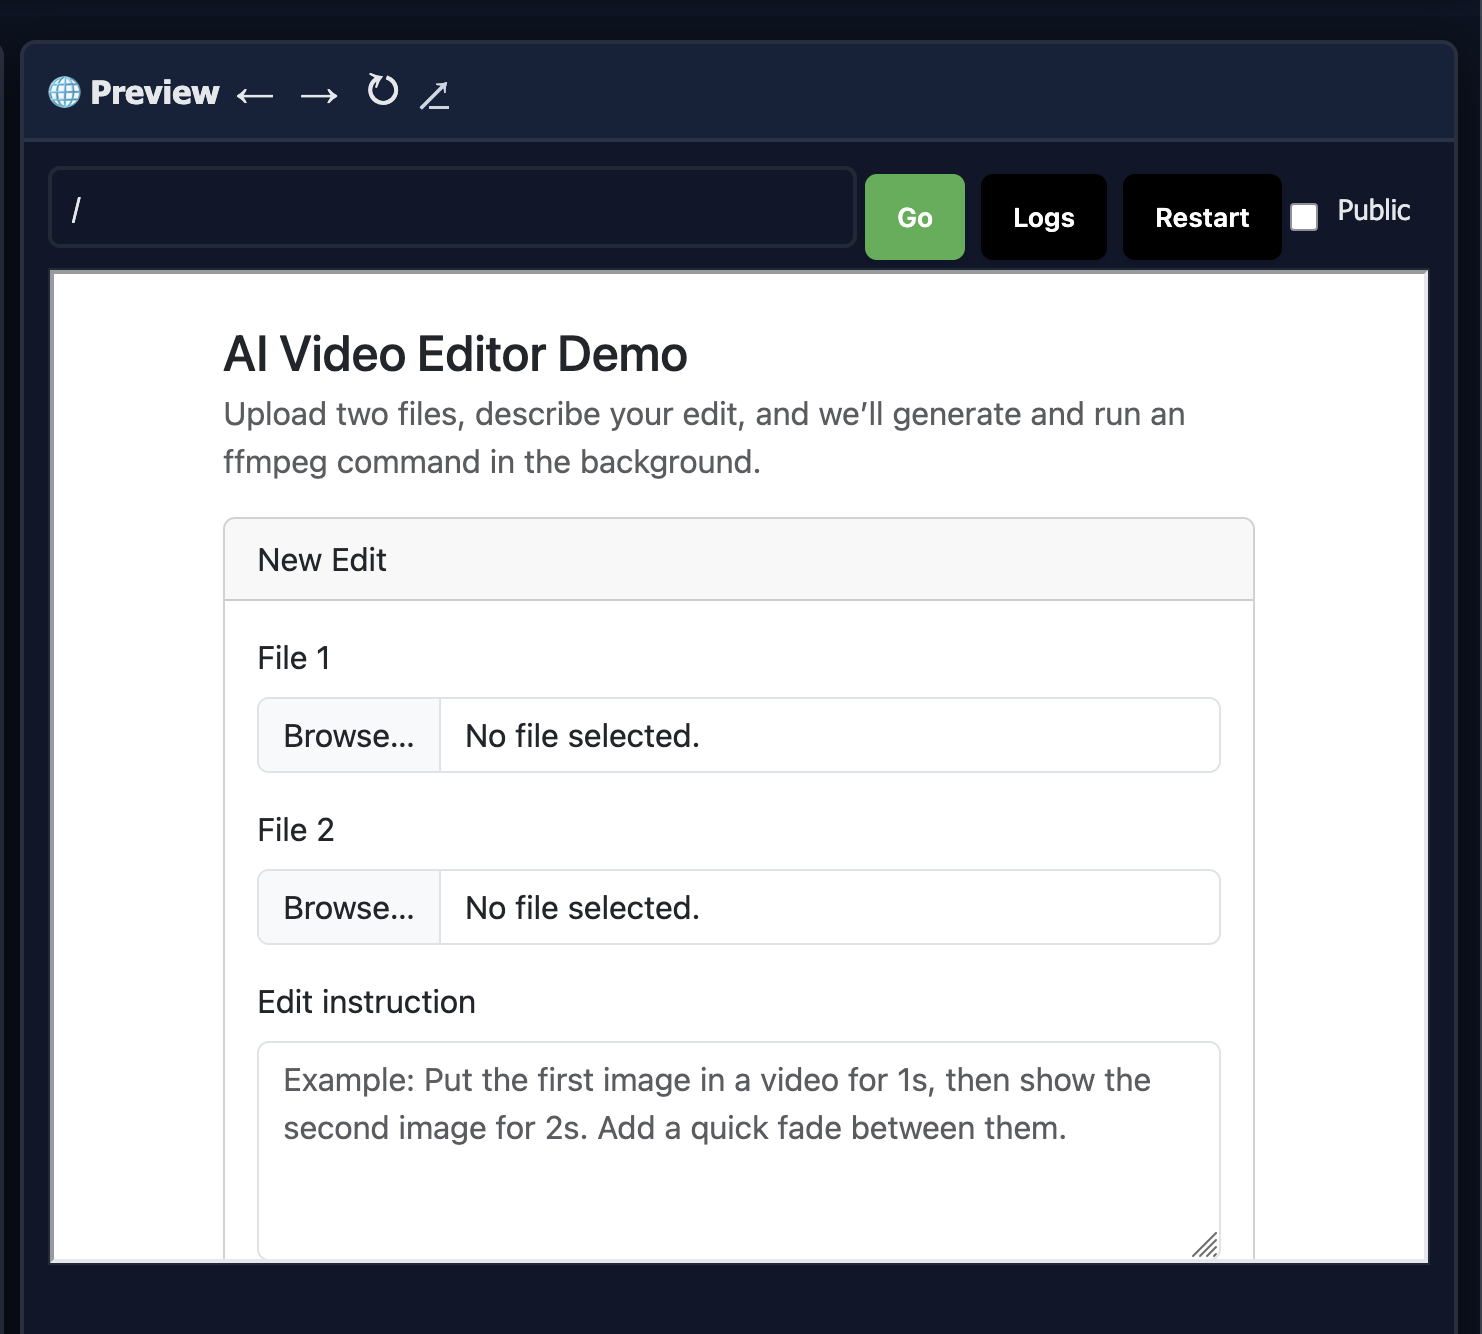
Preview
Your webapp preview appears in an embedded iframe as soon as the AI finishes work on a ticket. The preview updates automatically after ticket completion. You can open your site in a new browser tab for full-screen viewing. If errors occur during execution, they will appear in the preview iframe area, making it easy to see what went wrong.
You can optionally enable public preview sharing, which generates a shareable link to your Project Preview that others can access without logging in.
Working with Projects
Ticket Workflow
Tickets move through a workflow: they start in Planning as new tickets, move to In Progress when the AI is working on the ticket, then move to In Review when the AI completes them, and finally to Done when you approve them. When a ticket is in the In Review state, you can see the changes the AI made. Approving a ticket moves it to Done and creates an automatic git commit for that file's changes. Rejecting a ticket while it's In Review discards the changes in git.
If you reject a ticket that is already Done, the changes will not be automatically reverted in git. You would need to manually revert them if needed.
The preview iframe updates automatically after ticket completion, so you can immediately see the results of the AI's work. Any runtime errors will display in the preview area, helping you identify issues quickly.
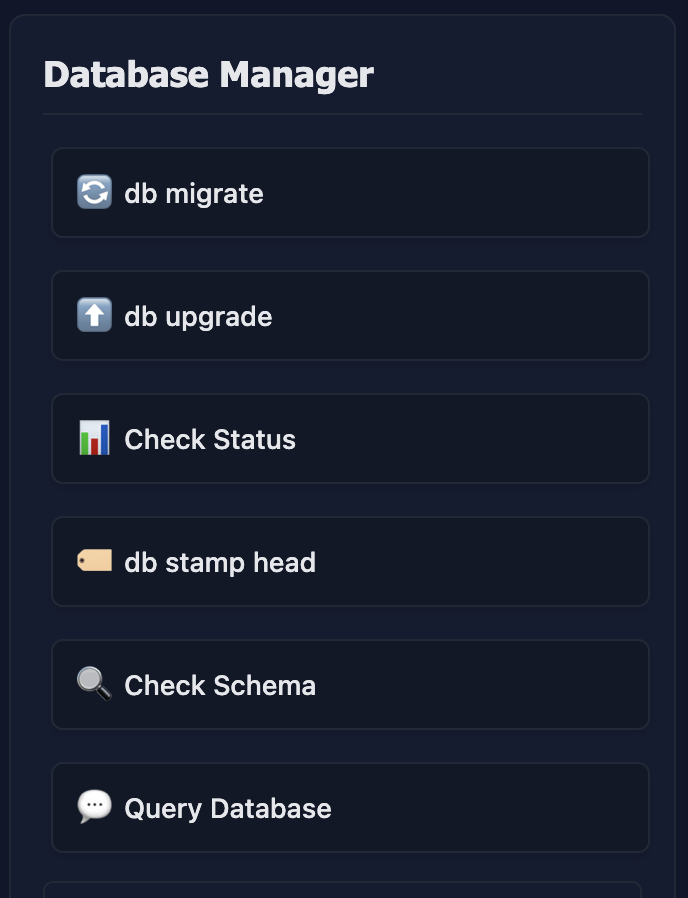
Database Management
If your project has a database (available on Personal and Pro plans), you can manage it through the Database Manager section on the main project page. Available operations include:
- db migrate: Create new database migrations
- db upgrade: Apply pending migrations
- Check Status: View current migration status
- db stamp head: Mark the database as up to date
- Check Schema: View the current database schema
- Query Database: Execute SQL queries directly
We aim to have our system manage your database successfully for you. These tools are available to you, but you might not need to use them.
The database section appears automatically when your project uses a database-enabled Docker image. All database operations run inside your project's container.
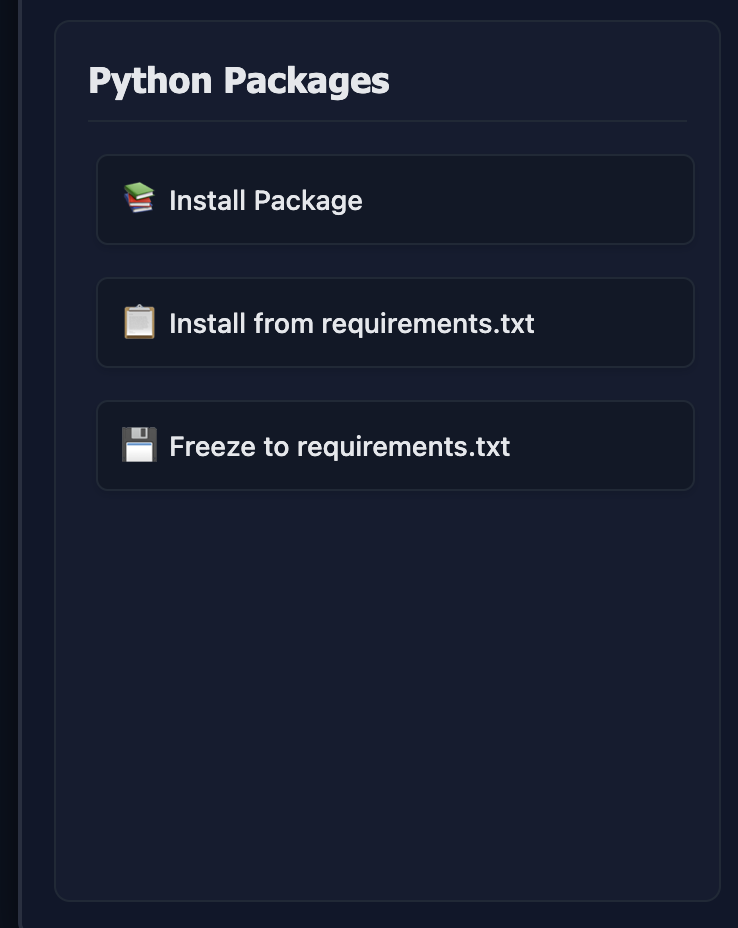
Python Package Management
The Python Packages section allows you to manage dependencies for your project:
- Install Package: Install a specific Python package via pip
- Install from requirements.txt: Install all packages listed in your requirements.txt file
- Freeze to requirements.txt: Generate a requirements.txt file from currently installed packages
We try to automatically install required pip packages if the AI has written code that requires it. But if you want to add a pip package yourself, these tools are available.
All package operations run inside your project's Docker container and persist across container restarts.
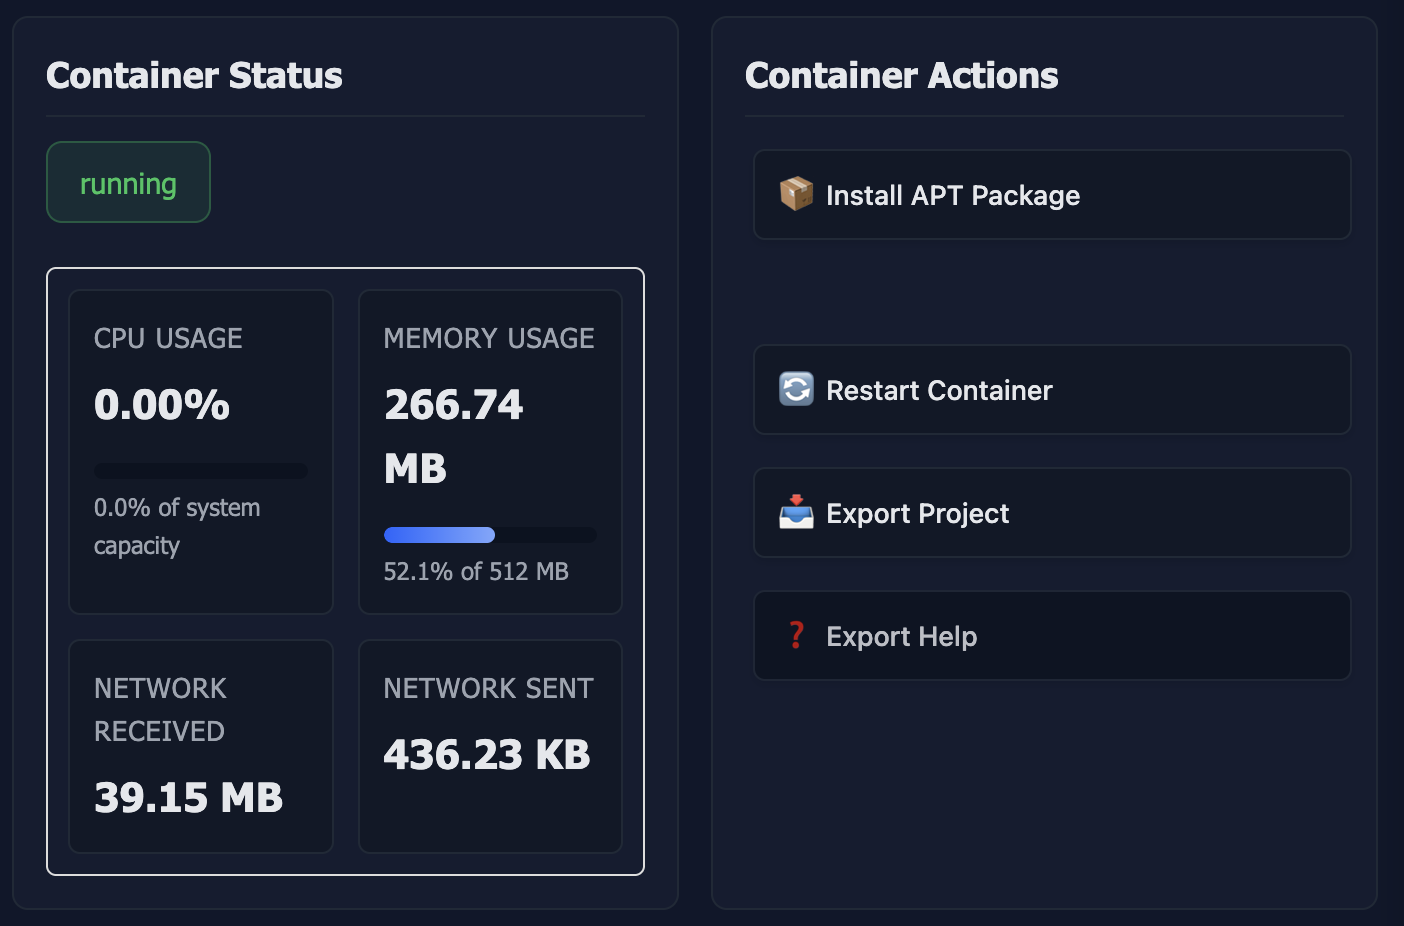
Docker Operations
The Docker section provides controls for managing your project container:
- Restart App: Restart your webapp container
- Export Project: Download your project files as a tar.gz archive, including .git and .env files
- Container Status: View resource usage and container health
On Personal and Pro plans, you can enable always-on projects, which keep your containers running even when not actively being used. This is useful for webapps that need to be continuously available, for example for wider testing or access remotely without publishing.
Publishing & Marketplace
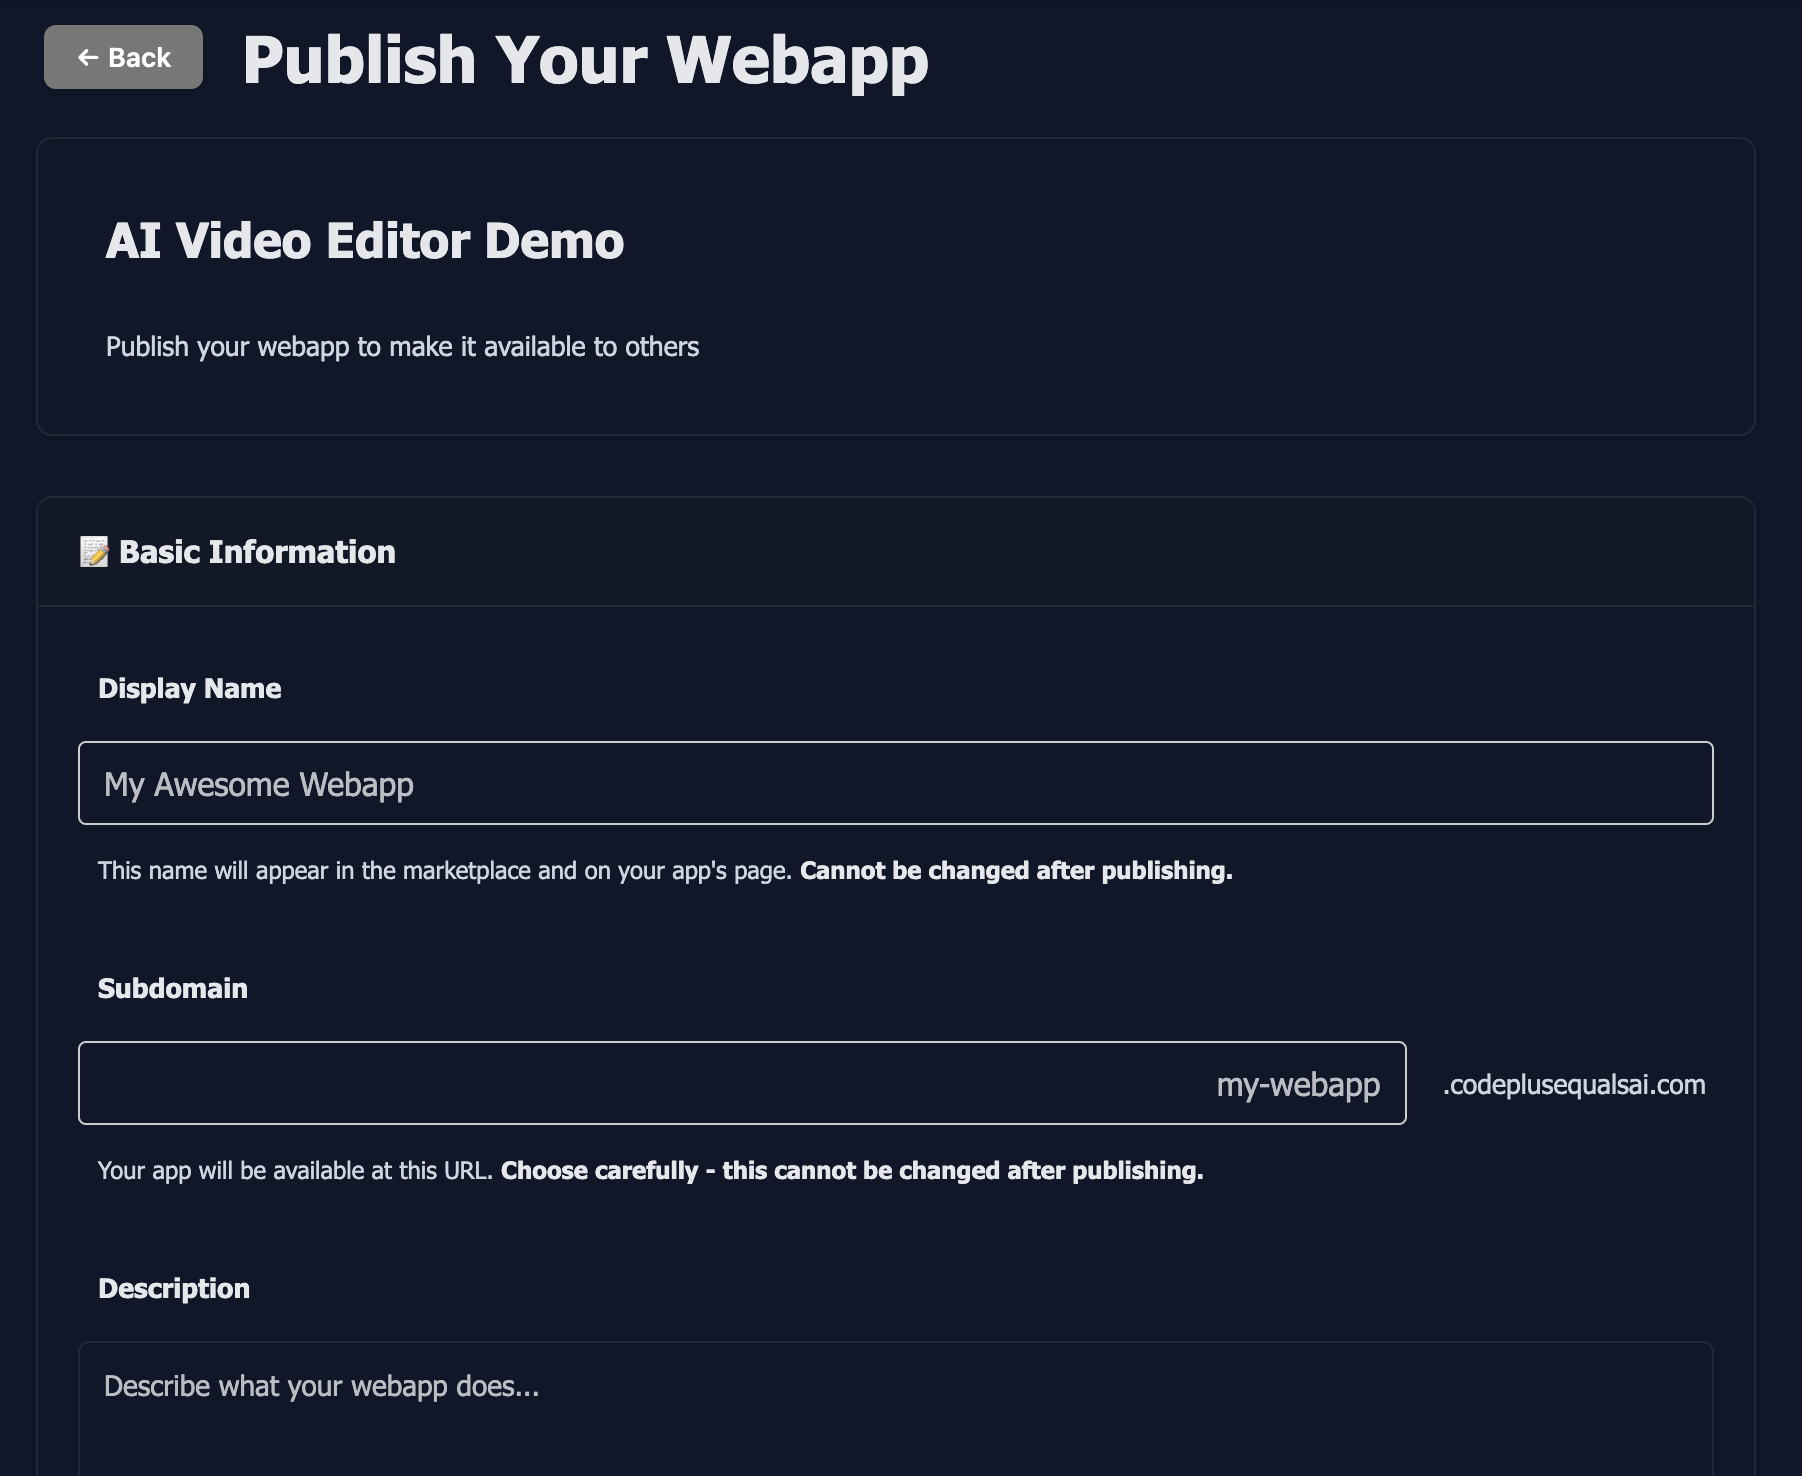
Publishing Your Webapp
Once your webapp is ready, you can publish it to make it available to others. Publishing is available on Personal and Pro plans. To publish, access the publish page from your project settings or use the publish button in your project interface.
When you publish, you provide:
- Display name: The name shown in the marketplace
- Subdomain: A unique subdomain for your published webapp (e.g., your-app.codeplusequalsai.com)
- Public description: A description of your webapp (200 characters or less)
- Screenshot: A screenshot of your webapp (required for publishing)
- Login requirement: Whether users must be logged in to use your webapp
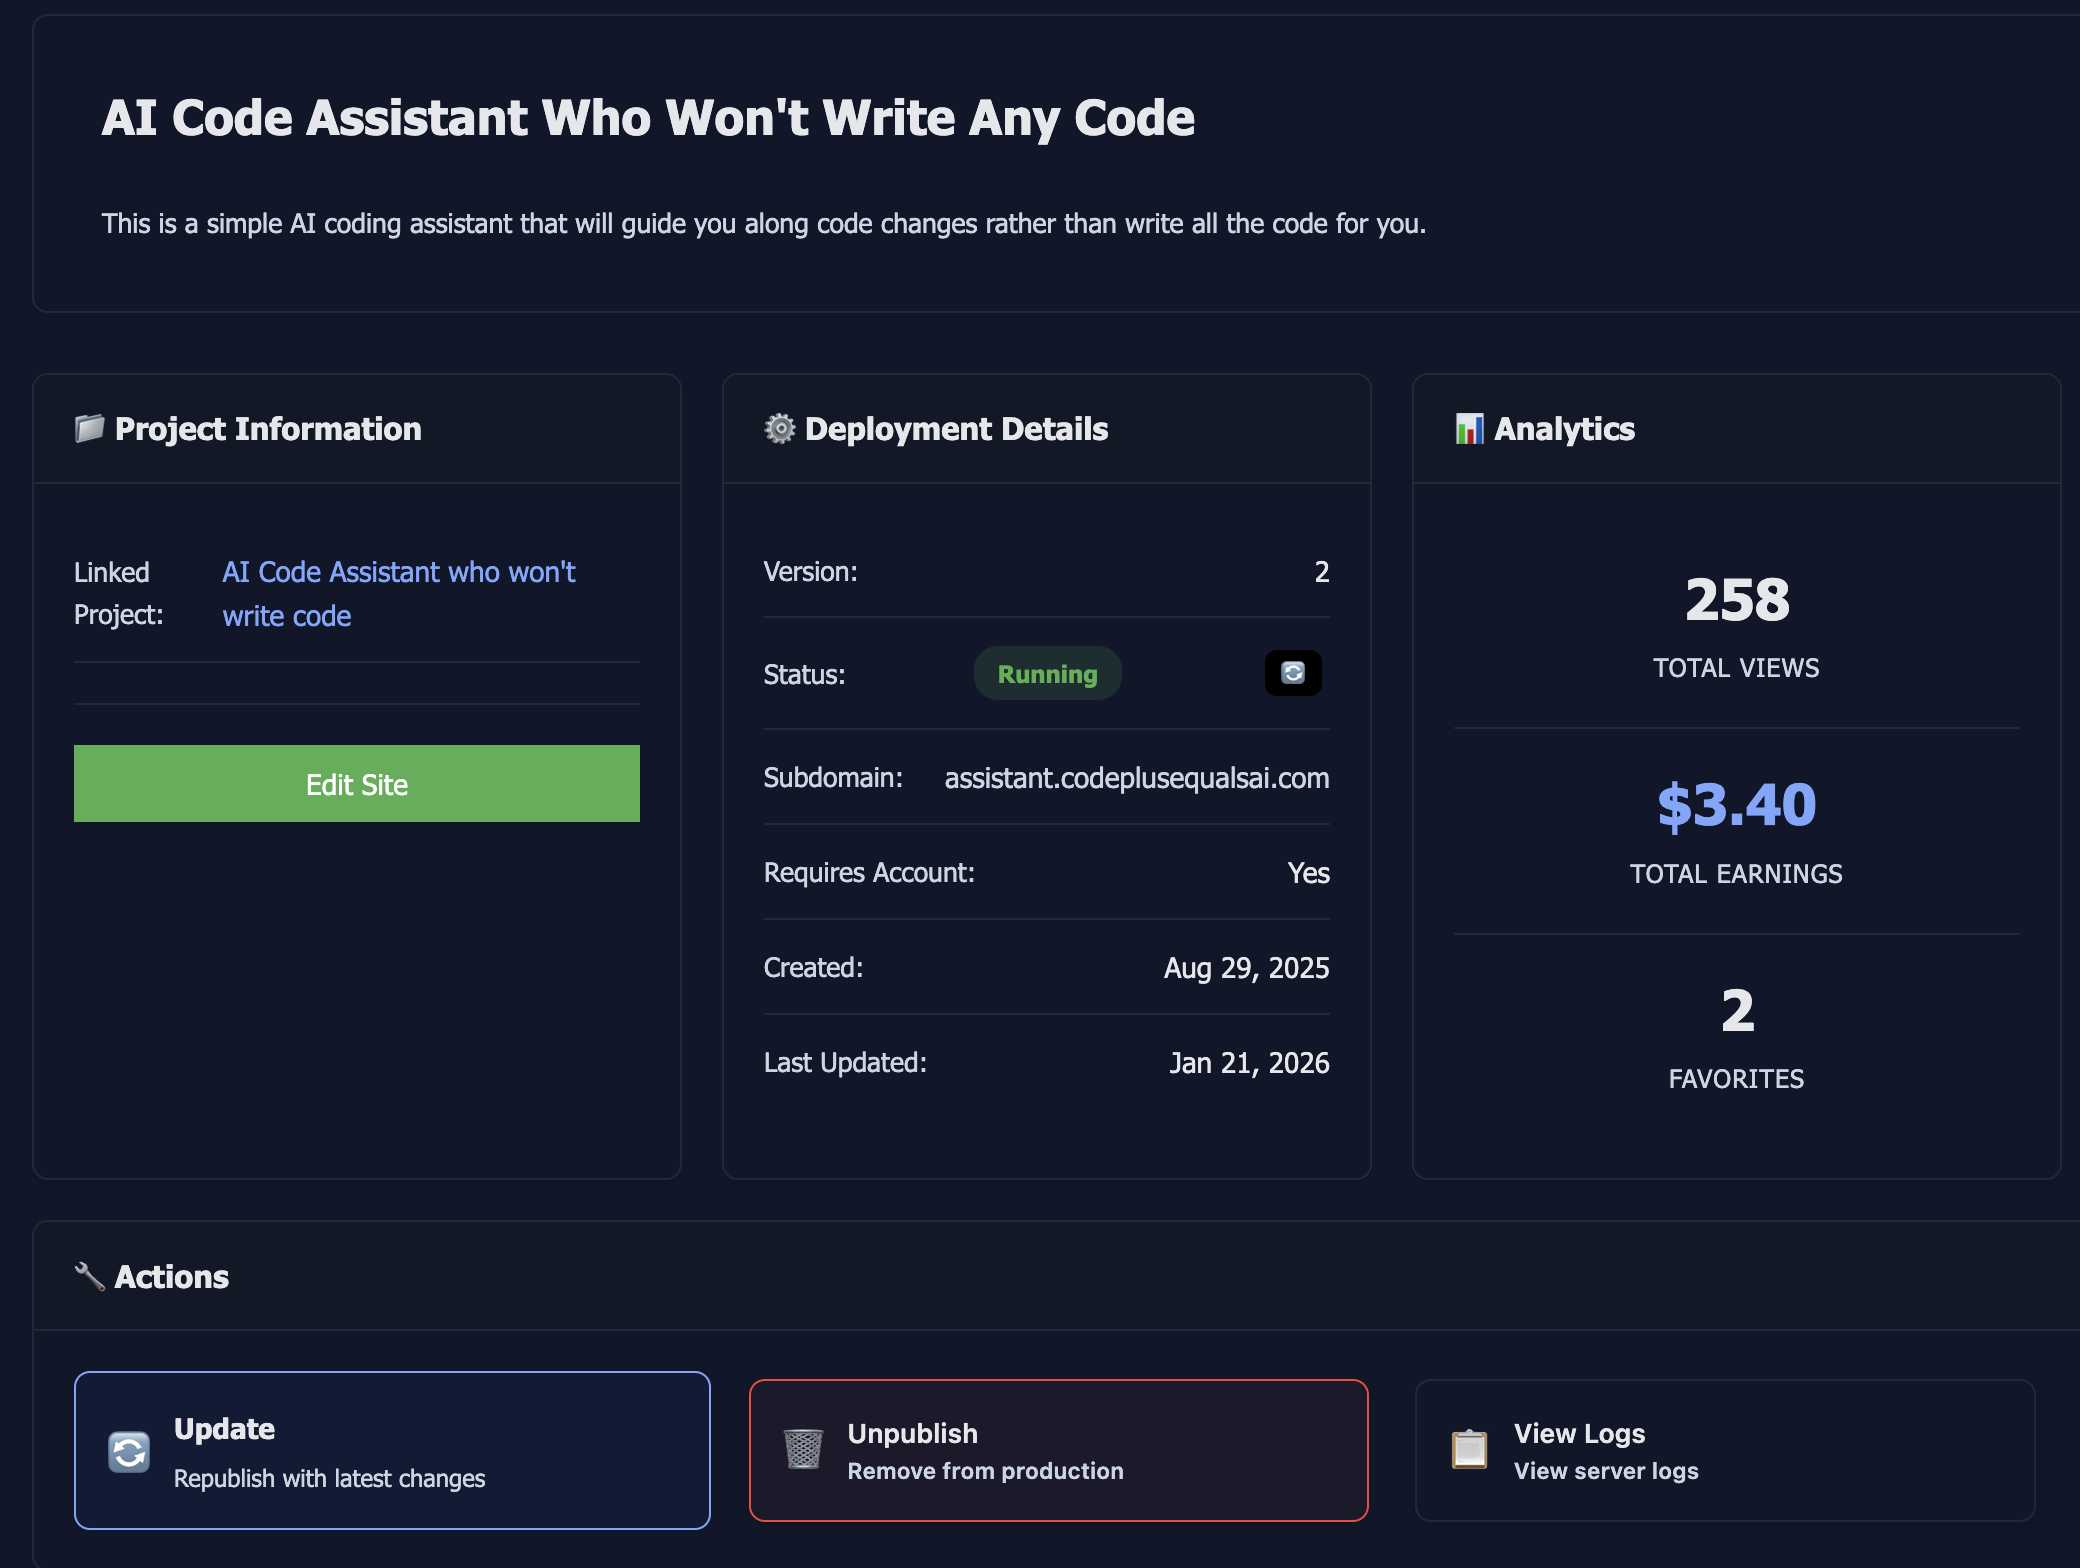
Publishing creates a snapshot of your current project state. The published version runs in a separate container from your development version, so you can continue developing without affecting the published webapp. When you make updates to your project, you can republish to update the live version.
After publishing, your webapp is submitted for review. Once approved, it becomes visible in the marketplace to all users.
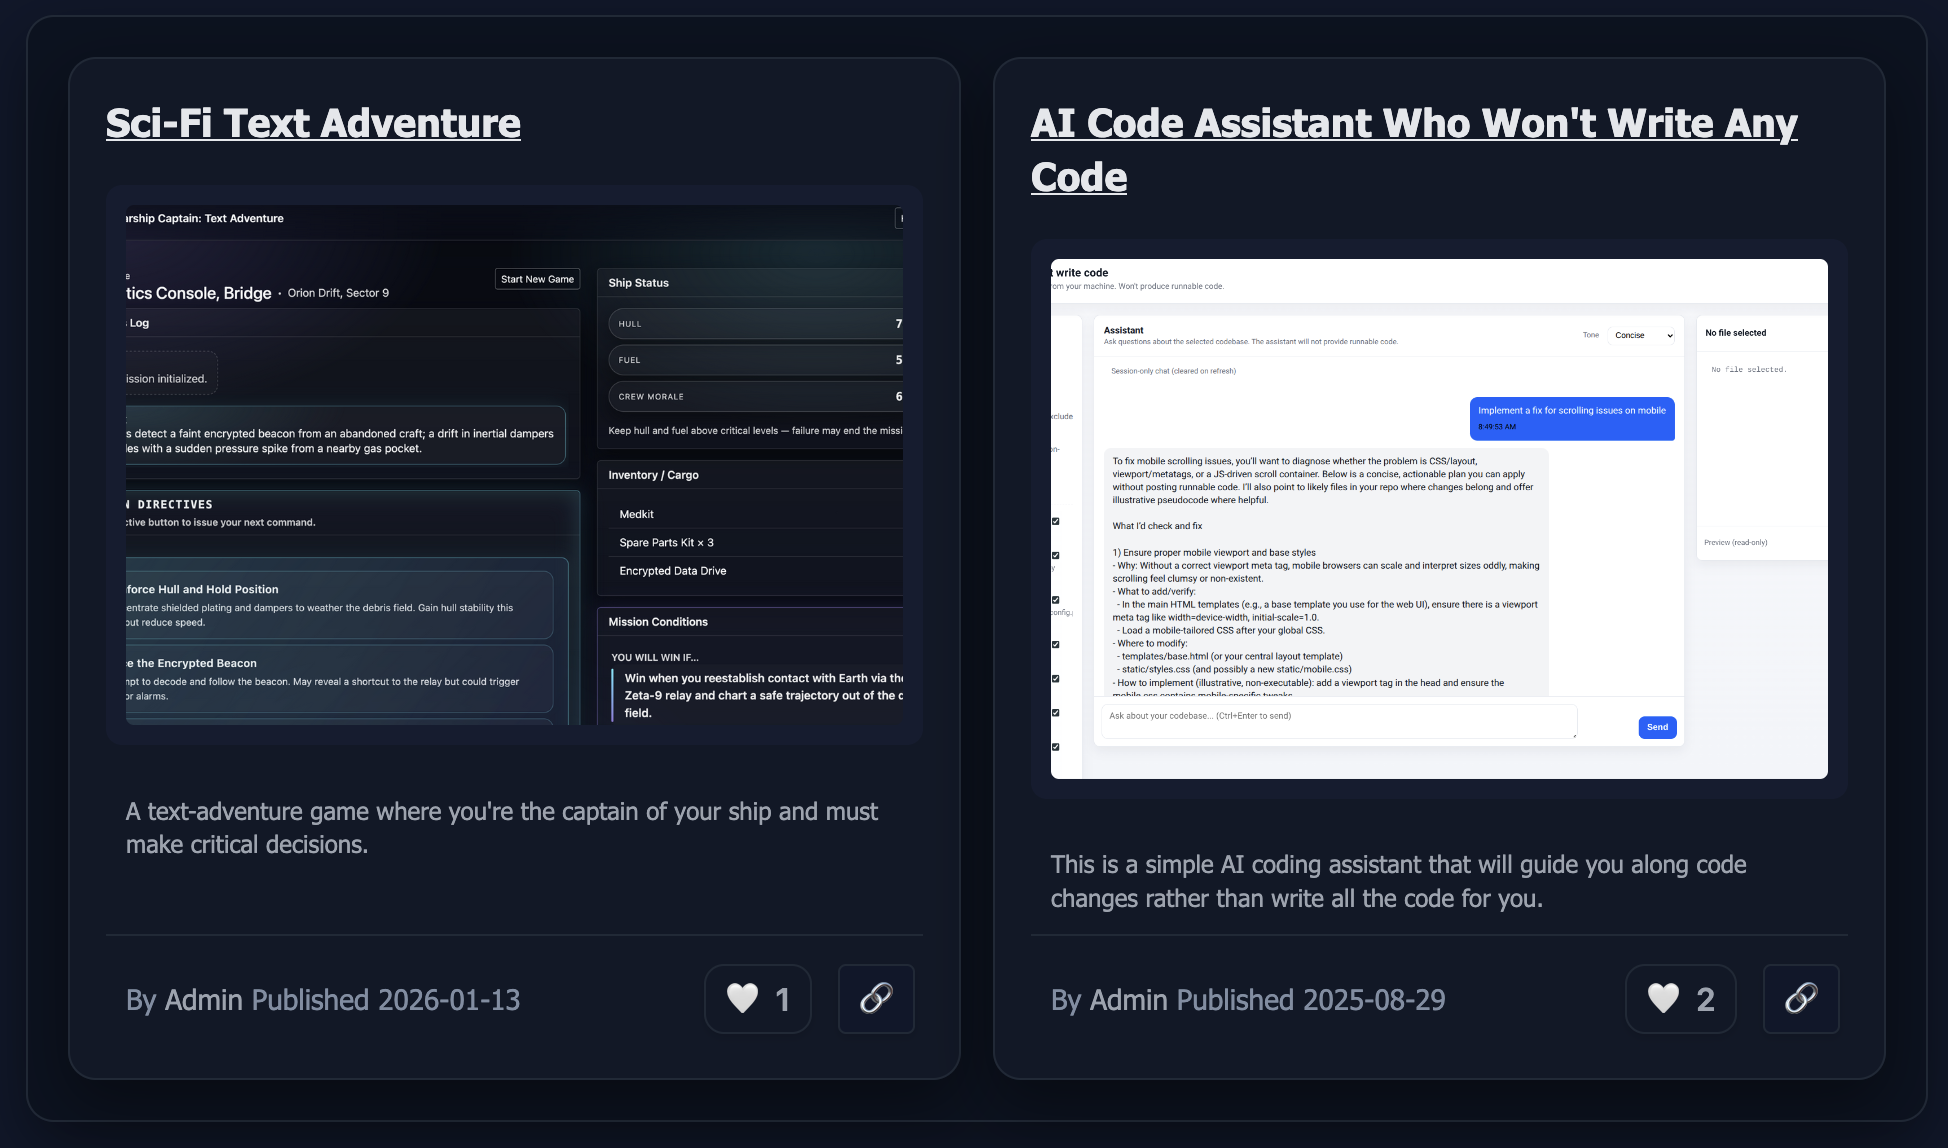
Marketplace
The marketplace is where all published webapps are displayed. You can browse published webapps, sort them by new, popular, or trending, and favorite the ones you find useful.
The marketplace serves as both a discovery platform for finding useful webapps and a showcase for your own published projects. You can click on any webapp to try it, view the developer's profile, or favorite it for easy access later.
Favorited webapps appear in your dashboard for quick access. You can also view your own published webapps from your account page.
Earning & Monetization
When you publish a webapp, you can earn money when other Code+=AI users use it. Here's how it works:
How Creator Earnings Are Calculated
You earn money only when a logged-in user other than you uses AI in your published webapp. That user pays the deployed-app end-user rate, and 80% of the provider token cost is credited to you. The end-user markup and creator share are separate percentages.
Login Requirements
Login required: each logged-in non-owner pays for their own AI usage at the deployed-app end-user rate, and you earn the creator share.
Login not required: anonymous usage is sponsored by your account at the lower builder rate. You do not receive a creator credit when your own account pays. The same rule applies when you use your own deployed app.
Tracking Earnings
Your earnings are tracked in two places:
- Your account page shows your total earned funds across all published webapps
- Each published deployment tracks its individual earnings, which you can view in the deployment admin page
Earned funds are added to your account balance and can be used to pay for your own token usage on Code+=AI, or you can withdraw them according to platform policies.
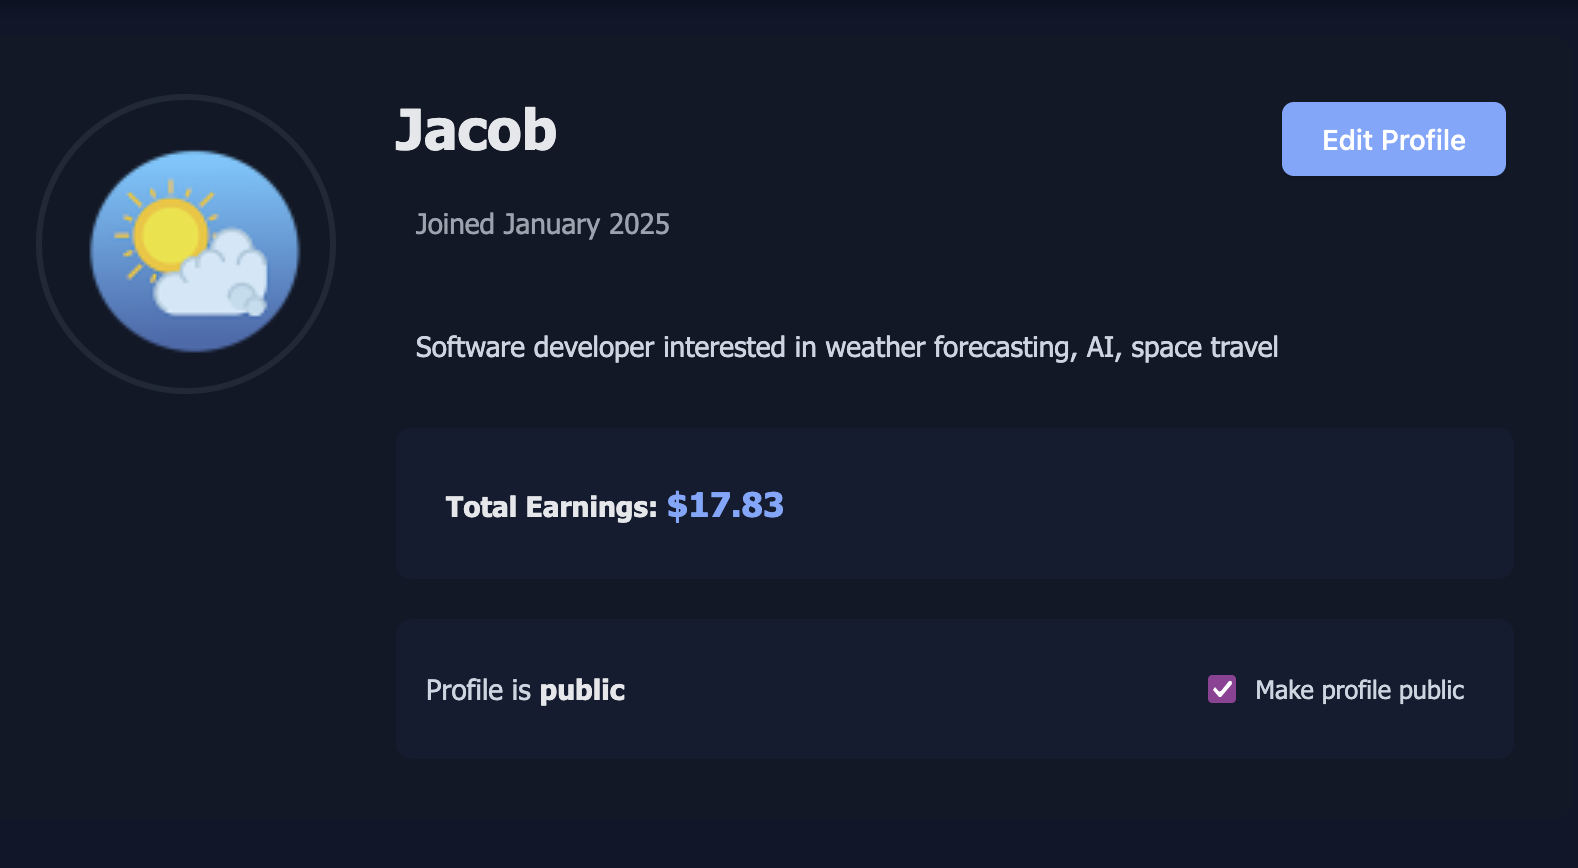
Developer Profiles
Each user can have a public developer profile that showcases their published webapps. Your profile is optional and private by default. It displays:
- Your profile photo (if uploaded)
- Your bio (if provided)
- All your published webapps
When users browse the marketplace, they can click on a developer's name or profile picture to view their profile (if it is marked for public viewing) and see all the webapps that developer has published. This helps build your reputation as a developer on the platform.
You can view and edit your profile from your account page.
Advanced Features
Deployment Admin
For each published webapp, you have access to a deployment admin page. This page provides tools for managing your published deployment, including viewing deployment statistics, earnings, usage metrics, and updating deployment settings. You can access the deployment admin page from your published webapp's management interface or from your account page where your published projects are listed.
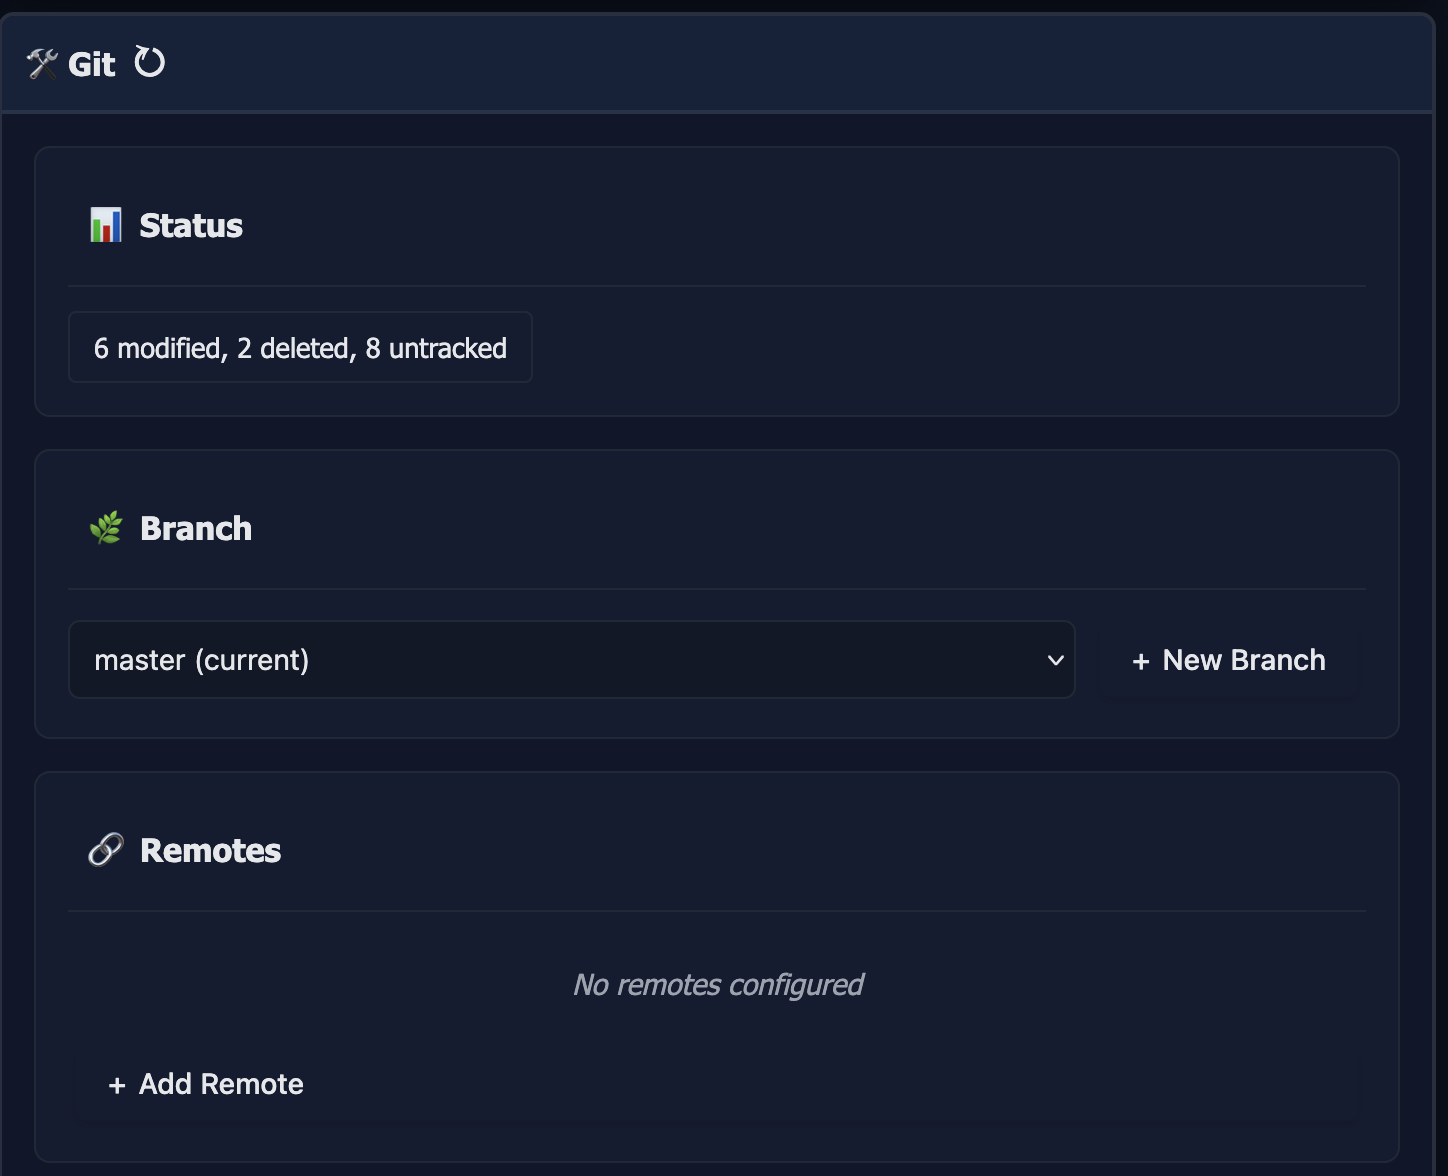
Git Integration
Code+=AI includes git support for tracking changes to your code. When you approve a ticket, a git commit is automatically created for that file's changes. The commit message includes the ticket title and description.
If you reject a ticket while it's In Review, the changes are discarded in git, effectively reverting the file to its previous state. If you reject a ticket that's already Done, the changes remain in git and would need to be manually reverted if desired.
You can also make manual commits through the git section. Write a commit message and commit your changes directly. You can view the git log to see the history of changes made to your project.
You can also add git remotes, so that you can push and pull from remote git servers like GitHub. You can also select your working branch. For private GitHub repos, set a GitHub Personal Access Token (classic, with repo scope) in Project Settings or Account Settings so push and pull can authenticate.
AI Assistant
Your project includes an AI assistant that has context about your project, including files, tickets, and conversation history. You can discuss ideas and plans with the assistant. Currently, assistant messages are not included in the prompts for tickets, but you can create a ticket directly from a specific AI assistant response to incorporate that context.
We are working on a solution to include assistant conversation context in ticket prompts automatically (and without polluting your context!).
How It Works
Code+=AI uses OpenAI and Anthropic models to write web and backend code based on the tickets you create. The system processes your requests and generates or modifies code files accordingly.
Code Generation Process
You don't really need to know anything in this section, but it's the nerdy and fun details of how Code+=AI works under the hood.
When you create a ticket and assign it to a file, the AI processes it differently depending on whether the file exists:
- For new or empty files, the LLM writes fresh code directly
- For existing files that require modification, a meta step is used that involves parsing Abstract Syntax Trees (ASTs) and writing them back again
Language-Specific Processing
Different languages use different tools for AST parsing and modification:
- HTML: BeautifulSoup (Python) code is written by the LLM and executed to produce modified files
- JavaScript/Typescript: babel is run in Node.js
- Python: ast and astor libraries are used
- CSS: PostCSS and run in Node.js
We have a detailed blog post about this approach: Prompting LLMs to Modify Existing Code using ASTs if you're curious to learn more!
Infrastructure
Each project runs in its own Docker container that serves your webapp. The container includes your code, dependencies, and runtime environment. Containers can be restarted, exported, or kept always-on depending on your plan and preferences.
Tech Stack Support
Currently, Code+=AI supports Python/Flask on the backend and raw JavaScript or React [Beta] on the frontend. Note: React projects aren't working very well yet. Support for additional tech stacks (Django, Node.js, Go, Flutter, Kotlin, Swift, and more) is planned for the future.
Pricing
Code+=AI offers a free tier that allows up to 2 projects with some feature limits. For more projects and additional features, we offer subscription plans detailed below.
AI Token Pricing
OpenAI and Anthropic charge a provider cost based on the selected model's input and output tokens. Code+=AI adds a markup to that provider cost. The markup depends on who is paying and why the AI call was made; there is no single markup for every use case.
The model prices shown while creating or configuring a project are already your builder prices. You do not need to add the markup again.
| AI usage scenario | Who pays | Current token charge | Creator earnings |
|---|---|---|---|
| Building a project | The builder | Provider cost + 20% (1.2× total) | None |
| Creator uses their own published app | The creator | Provider cost + 20% (1.2× total) | None |
| Anonymous visitor uses a published app | The creator sponsors the usage | Provider cost + 20% (1.2× total) | None |
| Logged-in non-owner uses a published app | The logged-in end user | Provider cost + 100% (2× total) | 80% of provider cost |
For any successfully billed LLM call whose calculated provider cost is below $0.01, the base cost is rounded up to $0.01 before the applicable percentage is added. Your account must have funds to cover AI usage; you can add funds on your account page.
These token charges are separate from subscription plan fees. We're also working toward local models that may reduce or eliminate provider token costs for some actions.
Subscription Plans
Starter
Start checking out Code+=AI and see how it works for you
- Create up to 5 projects
- Enable public preview
Personal
Personal plan for Code+=AI. Make more projects and share with friends.
- Create up to 20 projects
- Enable public preview
- Enable always-on projects
- Database for your webapp
- React [Beta] support (in progress)
- Publish your webapps
Pro
Professional plan for Code+=AI. Get all the features!
- Create up to 100 projects
- Enable public preview
- Enable always-on projects
- Database for your webapp
- React [Beta] support (in progress)
- Publish your webapps
- View our AI prompts in your ticket details
- More memory and faster dockers
Free to get started • No credit card required
Features Coming Soon
We're continuously working on new features and improvements. Here's what's planned:
- Terminal access: Direct terminal access to your project containers
- File uploads: Add images and other assets to your projects
- More model choices: We support OpenAI and Anthropic today; Gemini and local/self-hosted models are planned.
- Additional tech stacks: Support for Django, Node.js, Go, Flutter/Dart, Kotlin, Swift, and more
Have a feature suggestion? Let us know and we'll consider it.